
Education · Guide · 8 min read
How to fix a DNS leak in 2026: a step-by-step guide
What a DNS leak is, why it matters, and the exact steps to fix it on Windows, macOS, iOS, Android, and routers.
Looking to fix a DNS leak in 2026? A DNS leak exposes which sites you visit to your ISP even while the VPN is on. Here is how to confirm it and fix it on every major platform.
The short answer
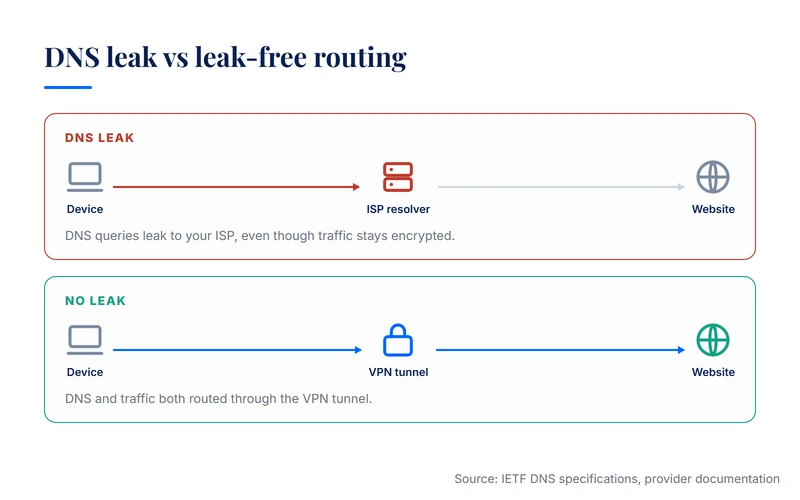
A DNS leak happens when your device sends DNS queries to your ISP's resolver instead of through the VPN tunnel. The result: your VPN encrypts your traffic, but your ISP still sees which websites you visit. Privacy half-broken.
The fix has two layers. First, confirm the leak with a free test (dnsleaktest.com or ipleak.net). Second, force DNS through the VPN by changing one setting in your VPN app, your operating system, or your router. The exact steps depend on which device you use.
This guide walks through each platform. Each fix takes between two and five minutes. None of them require technical expertise. By the end, your VPN will leak nothing, and your real ISP will see only encrypted traffic.
Our research methodology
This guide synthesizes operating system networking documentation, VPN provider support pages, and IETF protocol specifications (RFC 8484 for DNS over HTTPS). Read our research methodology for the criteria and weighting we apply. The fix procedures are sourced from official documentation, not personal testing.
What a DNS leak actually is
DNS (Domain Name System) converts human-readable web addresses (vpnvertex.com) into IP addresses (203.0.113.45) so your device knows where to send traffic. Every time you load a page, your device sends a DNS query first.
When you connect to a VPN, your traffic is encrypted and routed through the VPN's tunnel. The expectation: DNS queries should also go through the tunnel, to the VPN's DNS resolver. The reality: on many configurations, DNS queries leak out the side, going directly to your ISP's resolver in plaintext.
The leak does not break your VPN entirely. Your actual web traffic still flows encrypted. But your DNS queries reveal which sites you visit, which is enough to compromise the privacy you were trying to gain. Your ISP, anyone monitoring your network, or anyone on a hostile WiFi network can see your browsing. A working VPN routes DNS through the tunnel. A leaky VPN does not.
How to test for a DNS leak
Testing takes one minute and requires no install.
- Connect to your VPN.
- Confirm the VPN shows as connected in its app (typically a green light or a country flag).
- Open a private browser window to keep cache and cookies out of the picture.
- Visit dnsleaktest.com. Click Standard Test or Extended Test (Extended is more thorough).
- Wait 10 to 20 seconds while the test runs.
- Read the results.
The test shows the DNS servers your device is using, each identified by IP and ISP name. If the servers belong to your VPN provider (NordVPN, ExpressVPN, Cloudflare 1.1.1.1, and similar), DNS is going through the tunnel. No leak. If the servers belong to your ISP (Comcast, Verizon, BT, and similar), DNS is leaking and the VPN is not protecting it.
Alternative test sites: ipleak.net (broader leak test, includes WebRTC and IPv6) and browserleaks.com/dns (technical, shows more diagnostic detail). If you suspect a leak only in specific contexts (after waking your computer, after switching networks), run the test in that context to reproduce.
The three most common causes
DNS leaks fall into three categories. Each has a different fix.
1. The VPN app does not enforce DNS through the tunnel
Some VPNs let your operating system DNS settings override the VPN's settings. Most major paid VPNs (NordVPN, ExpressVPN, Surfshark, Proton VPN) enforce DNS in their default settings. Some smaller and free VPNs do not.
2. IPv6 leak
Many VPNs are IPv4-only, but modern operating systems use IPv6 by default when available. If the VPN does not handle IPv6, your IPv6 DNS queries go directly to your ISP, bypassing the tunnel. The fix: disable IPv6 system-wide or use a VPN that handles IPv6 explicitly.
3. Operating system override
Some Windows configurations, especially after Windows Update or with specific networking software, force DNS through their own resolver. Your VPN's DNS gets overridden silently. Fix: configure DNS manually at the OS level. If you are not sure which cause applies, run the test above and identify the IP of the leaking DNS server. The owner of that IP tells you the cause.
How to fix a DNS leak on Windows
- Update your VPN app. Old versions of major VPN apps had DNS leak bugs. Update to the latest version first.
- Check the VPN app's DNS setting. Open settings and find the DNS or Network section. Make sure Use VPN DNS or equivalent is enabled. Disable any Custom DNS option unless you have a specific reason to use it.
- Force DNS at the OS level. Open Settings, then Network and Internet, then your active connection, then DNS server assignment. Click Edit, set it to Manual, set IPv4 to Cloudflare (1.1.1.1) or Quad9 (9.9.9.9). Save.
- Disable IPv6 if you do not need it. Network adapter options, right-click your adapter, Properties, uncheck Internet Protocol Version 6. Click OK and reboot.
- Re-test at dnsleaktest.com. It should now show your VPN provider's DNS, not your ISP's.
How to fix a DNS leak on macOS
- Update your VPN app. Same logic as Windows.
- Check the VPN app's DNS setting. Confirm DNS is set to use the VPN's resolver. Disable any custom DNS unless specifically needed.
- Force DNS at the OS level. System Settings, Network, your active network, Details, DNS. Add Cloudflare (1.1.1.1) or Quad9 (9.9.9.9). Remove any servers that belong to your ISP. Apply.
- Disable IPv6 if you do not need it. In the same panel, TCP/IP tab, set Configure IPv6 to Link-local only or Off. Apply.
- Flush the DNS cache. Open Terminal and run sudo dscacheutil -flushcache then sudo killall -HUP mDNSResponder.
- Re-test at dnsleaktest.com.
How to fix a DNS leak on iOS
iOS is more locked down than desktop systems. The fix relies on the VPN app, not on manual OS configuration.
- Update your VPN app from the App Store.
- Open the VPN app and enable any DNS protection toggle. In NordVPN and ExpressVPN this is typically on by default.
- Enable Always-On VPN if available, under Settings, General, VPN and Device Management, your VPN profile.
- Disable iCloud Private Relay temporarily, under Settings, your name, iCloud, Private Relay. It sometimes conflicts with VPN DNS routing.
- Re-test in Safari at dnsleaktest.com.
If leaks persist on iOS, your VPN app's iOS implementation is faulty. Switch to a provider with a clean iOS leak test record.
How to fix a DNS leak on Android
Android handles VPN DNS more reliably than iOS, but configuration matters.
- Update your VPN app from Google Play.
- In the VPN app, enable DNS protection. Some apps call it Use private DNS or Override system DNS.
- Configure Private DNS at the OS level: Settings, Network and Internet, Private DNS. Enter one.one.one.one (Cloudflare) or dns.quad9.net (Quad9).
- Enable Always-On VPN: Settings, Network and Internet, VPN, gear icon, toggle Always-on VPN and Block connections without VPN.
- Re-test in Chrome at dnsleaktest.com.
The combination of Private DNS plus Always-On VPN catches most DNS leaks on Android.
How to fix a DNS leak on a router
Router-level VPN protects every device on the network, including those that cannot run a VPN app. It is also the most complex to configure.
- Confirm your router supports VPN client mode. Common firmwares: DD-WRT, Tomato, OpenWRT, Asus Merlin.
- Set the router DNS to use the VPN's DNS, under WAN settings, or to Cloudflare 1.1.1.1.
- Disable IPv6 on the router if your VPN client mode does not support it.
- Flush DNS cache on each connected device.
- Re-test on each device individually.
ExpressVPN's router app and NordVPN's router setup pages document this process for the most common router models.

FAQ
Final word
A DNS leak is a small misconfiguration with a large privacy impact. The fix is quick, free, and reliable on every major platform. Run the test at dnsleaktest.com. If you see your ISP, fix it using the steps for your operating system. Re-test. Confirm no ISP servers appear in the results.
Combined with a working kill switch and a VPN that has been audited, leak-free DNS is the third pillar of a VPN setup that actually delivers continuous privacy. If your VPN keeps leaking even after the fixes above, the VPN itself is the problem. Replace it.
